Adding or Disabling a User
Every Staff Member Needs their own User Logon
From a workflow perspective, it is easier if everyone in your company shares login credentials for patientNOW. However, patient privacy and security guidelines (both HIPAA and state-level legislation) requires each user to have their own logon because it is essential to be able to uniquely identify users’ activities with sensitive information.
All users do not have the same access rights to perform functions in patientNOW, even among staff who have similar job functions.
You must be able to revoke a user's access in real-time. You cannot do this if multiple users share login credentials.
While it’s critical to know just what’s happening to the sensitive information, such as when it was opened or modified—it’s equally important who’s involved. Unique logins give you just that ability to identify and track user activities.
Create the User
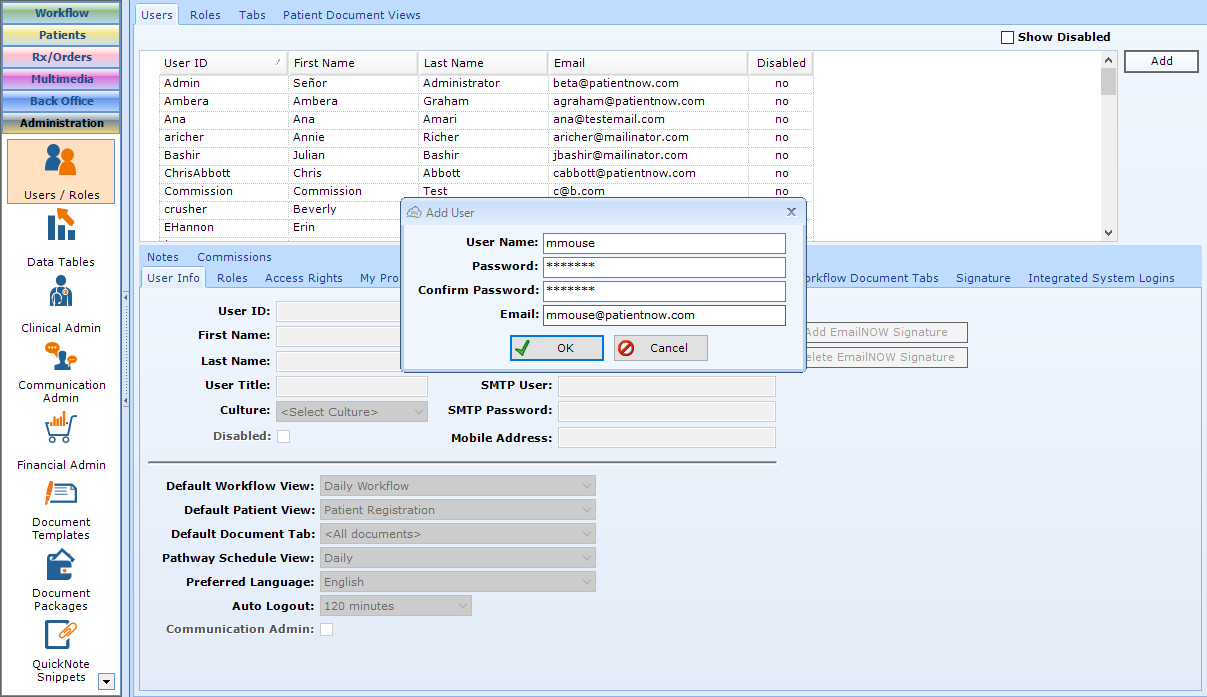
Navigate to Administration | Users/Roles, Users tab.
Select Add in upper right corner and enter the data.
- User Name
- Password. Passwords must be at least 8 characters and include 1 numeric digit (e.g. 0 - 9).
- Confirm Password
Enter Additional User Information
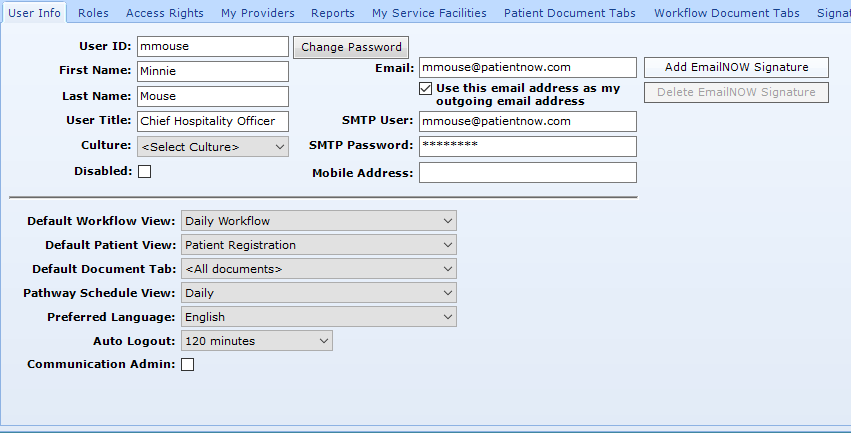
Navigate to the User Info subtab.
- First Name
- Last Name
- User Title
- Culture. Should be United States unless your practice is in Canada or Australia.
- Add an Email Signature. If you wish to have a custom email signature for this user when they are sending emails out of patientNOW, click here and enter. For additional information, check out Configuring an Email Signature for a User
- Use this email address as my outgoing email address. If this user will send emails from patientNOW, check this box if you want the outgoing address to be their personal email. When unchecked, the outgoing email address is the one configured in Administration | Data Tables, Appt Reminder Settings.
- SMTP Userreenter the email
- SMTP Passwordthe email account password
- Mobile Address. You may enter the user's cell phone in this field for information only; patientNOW does not use it for anything at this time.
- Default Workflow view. This is the specific area to which the user is directed when selecting the Workflow section. Normally, clinical users will use Daily Workflow and administrative users will use the Scheduling section.
- Default Patient View. This is the specific area to which the user is automatically directed when selecting the Patients section. Many administrative users will want Patient Registration or Patient Communications. Clinical staff normally prefer Clinical Information.
- Default Document Tab. This is the specific tab to which the user is automatically directed when selecting Patients | Patient Documents.
- Pathway Schedule View. This is the specific tab in Workflow | Scheduling to which the user is automatically directed when scheduling appointments from the Patients | Patient Communications, Treatment Pathways tab.
- Preferred Language. Should be English; patientNOW does not currently recognize any other language.
- Auto Logout. This is the amount of time until patientNOW automatically logs out when the user is inactive. Since leaving patientNOW open on a computer is a huge privacy and security risk for your practice, you should consider a shorter time out.
Assign the Access Role(s)
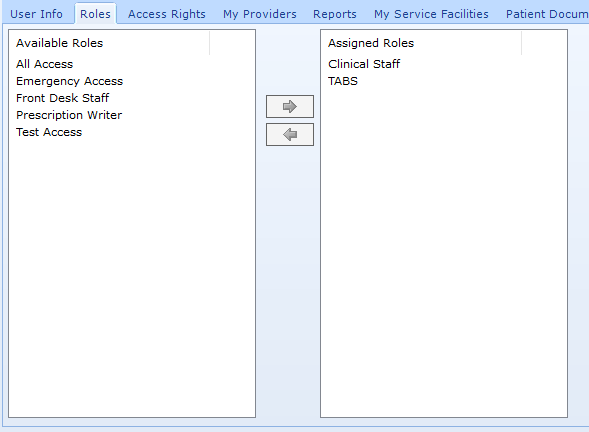
Navigate to the Roles subtab.
Select the TABS role; the tabs role is always required.
Select the other role that applies to this user; most users have only one role in addition to the TABS role.
If the user is a provider who prescribes, select the Prescription (RX) Writer role.
Disable a User
Navigate to Administration | Users/Roles, Users tab.
Select the user in the upper window.
Select the Disabled checkbox on the User Info subtab.
Once the user is disabled, they will no longer be able to log in to patientNOW.